Keep in mind that the width of the fence is based upon the width of your tabletop. My fence is 8" longer than the top is wide, which in this case is 36".
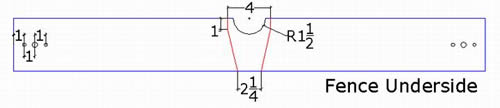
The layout of the holes for the clamps and the venturi are like this...
The clamp assembly is made up of; 2 guide pins, a threaded rod, a locking pin, a captured nut, a wooden handle and finally the clamp block itself. Be sure to make the clamp block's upper region 1/4" thinner than the thickness of the tabletop, this ensures the lower region will grip firmly on the underside of the tabletop. Here's a close-up of the clamp detail...

The holes for the guide pins should be 3/8" deeper than the length of the pins, this ensures the pins will not bottom out in the holes and preventing the clamp block from firmly contacting the underside of the tabletop.
Do not allow the clamp block's width to interfere with the side of the carcass. A 1/2" clearance from both the tabletop's edge and the side of the carcass is about right.
The threaded rod is 1/2" all thread. The guide pins are 5/16" straight steel rod. The locking pins are 1/8" straight steel rod. The handle and clamp blocks should be made from a suitable hardwood such as, Red Oak, Maple, etc. The fence should be made up from several thicknesses of 3/4 MDF or particle board. I made mine 4" high x 5" deep x 44" long and covered the top and front with plastic laminate because this area will receive a goodly amount of pencil markings over time and the laminate allows easy cleanup of these surfaces.
An AutoCad drawing of this detail is available
HERE.