We'll get started by first taking a look at the drawing. I imagine
you'll immediately notice the absence of overall measurements -
well, they aren't there because this jig will be specific to your
bandsaw.
Basically, the length is determined by what you think will be the
largest diameter circle you'll ever cut and the width is determined
by the depth of your bandsaw's table.
Now that we know the dimensions, the next step is to select the material to make it from. I used 3/4" white Melamine because of it's strength and slippery surface - but plywood or particleboard would work just as well. The main reason I chose Melamine is because you can clean it easily. I often find myself making marks and other notations on jigs of this sort and with the grime transferred from your hands, it'll get pretty grimy.
Be sure to wear these <tap, tap> safety glasses!
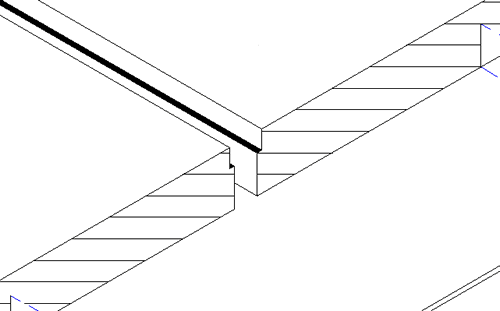
- Outfit your router with a 1/4" straight-cutting bit and route a groove all the way from one end to within 2" of the other end and clear through the sheet (you may have to do this in two passes).
- Without adjusting the fence or guide, switch bits to a 3/8" straight-cutting bit.
- Adjust the cutting depth to slightly over 1/4" then orient the sheet so that you'll be routing on the upper surface and route the stopped groove being sure to stop at the same location as you did before.
Here's an enlarged view of what you're trying to achieve

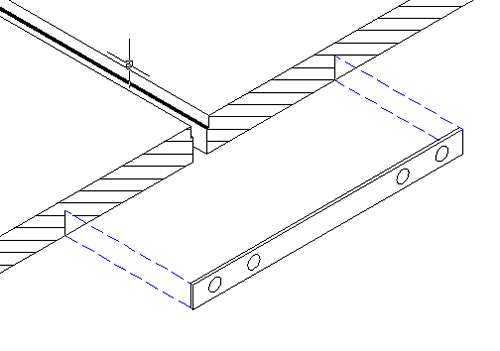
If you don't have a 3/8" straight-cutting bit, simply adjust the fence for a wider cut. After the stepped groove has been milled you should attach a strip on the end of the jig to keep it from spreading apart or twisting out of plane. I used a 1/16" metal strip.

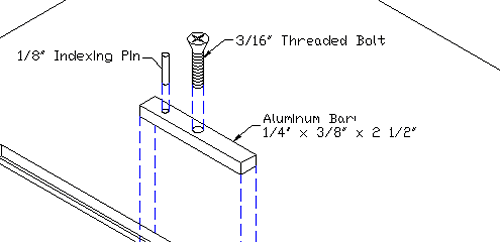
The next step in the process is to make the adjustable index bar, which is the part that slides back and forth within the stepped groove. I used a piece of scrap aluminum but I'm sure a hardwood like Cherry, perhaps Maple would be suitable.

The indexing pin is what the material being cut will pivot on. It doesn't have to be anything special - I used a finish nail - but it's important that the pin fits tightly in the bar.
-
Drill the hole in the bar slightly less in diameter than the pin so that you have to drive the pin into position. Allow the pin to protrude 3/8" out of the bar.
-
Drill and countersink for the flathead machine screw - make sure it isn't proud of any of the bar's surfaces. Grind the head if necessary.
-
Cut a 1/4" x 1 1/2" circle of the same material you used for the bar (you'll see why it's a circle later).
-
Drill and tap for a hole in the center for the size machine screw you used.
The part you just made is the clamp (not shown in any of the drawings). Its purpose is to ride on the underside of the jig, directly under the stepped groove, so that when you tighten the screw it clamps the bar in the stopped groove.
Assemble these parts in their respective locations and make sure the bar can slide back and forth in the groove easily. If not, sand both sides of the bar equally until it does.
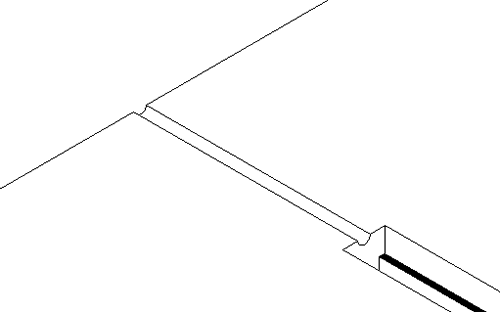
The next thing we need to do is route an indexing line at the head of the jig. When cutting circles on the bandsaw it is extremely important to keep the cutting edge of the blade directly in line with the pivot point. Take a look...

Route an 1/8" groove along the centerline of the stopped groove to act as your indexing line. In the future, the center of this groove will align with the cutting edge of the bandsaw blade.
Attach 3/8" hardwood strips around the entire perimeter of the jig's bottom surface.
Your jig needs to have a way to slide onto the bandsaw's table so that it registers in the same position time and again. The easiest way to do this is to install a hardwood runner on the underside of the jig. However, we just installed perimeter strips, which means the runner has to be thicker than the strips.
Make a hardwood runner 1/16" LESS than the combined thicknesses of the strips and depth of the table's miter slot.
At some point in time, like when you're cutting smaller circles, the clamp on the underside of the jig will need to slide past the runner - this means we need to notch the runner.
With the runner resting loosely in place, slide the bar/clamp assembly up to the runner and mark where the notch needs to be. This is why you cut the clamp in a circle - it if was square the notch would have to be larger.
Now it's time to position the runner where it needs to be. Be sure to orient it square to the length and in just enough from the end so that your first cut takes off a slice of the jig. Glue and nail the runner in place.
I made mine a little more versatile and routed a shallow groove slightly behind the indexing slot to accept a sticky-backed measuring tape.
Have fun using your new circle-cutting jig for the bandsaw.
|