|
Don't get me wrong, I like Norm
Abram. I think he has a ton of talent and does a bang up job
instructing and propagating woodworking but I have to say it pains
me severely to watch him build regular, run-of-the-mill, everyday
cabinets. He spends so much time and wasted energy on them
that I want to run screaming into the night. We're talking
basic kitchen and bathroom variety cabinets here, not ship-going
vessels. The function of a cabinet is to sit there or hang
there and that's it, that's all it'll ever do. All those fancy
screws and all the glue and all them rabbets and dadoes he uses are
totally unnecessary. There, I said it and I'm not the least
bit afraid of doing so.
I've been stapling cabinets
together for twenty years or better and I have yet to hear of one
falling apart or coming off a wall. So, before I go any
further let me address how I go about making my cabinets:
-
I use quality sheet
goods; AC or BC plywood, Melamine or particle board (more on this later)
-
I have a dimensioned drawing of
all my cabinet sizes - both base and wall (this makes my material
cutting faster and easier)
-
The only thing I fret on are the
face frames - in other words I don't get anal on carcase assembly
That's it! Those are the only
things so let's move on.
Tools you'll need:
-
A tablesaw - yes,
you could cut the parts with a circular saw but a TS is faster and
more accurate
-
A 1/4" crown stapler
capable of shooting 1 1/2" and 1 1/4" staples
-
A brad nailer capable of
shooting 1 1/2" brads
-
An air compressor
-
A planer
-
A drywall square
-
A framing square
-
A miter saw
-
A hammer
-
A pair of dykes
-
A pencil
-
A pencil sharpener
-
Lighting
-
Electricity
-
A workbench
-
Pipe or bar clamps
-
A cordless drill equipped with
a #2 Phillips or square drive bit
-
A stupid worthless cat
I'm pretty sure you can do without the damned
ole stupid worthless cat but the other stuff you'll need.
There are two types of cabinets; base and
wall. Any that rest on the floor are base cabinets. Guess which ones
are on the wall?
If you said 'wall' then you're an excellent
guesser.
Ok, the next thing are the cabinet rules.
These rules are for standard base and wall cabinets, meaning 24" deep x 34 1/2"
high and 12" deep x 30" high respectively (if you want your cabinets different
then you'll need to adjust these dimensions accordingly). These rules
shall never change so consider them chiseled in stone.
I know, you're saying, "But Dear ole Joe, base
cabinets are 36" high how's come yours are 34 1/2" high?" Well, that's
because we haven't put on the counter top yet. Don't worry, we'll get
there.
Base cabinets
-
Sides and partitions - 22 3/4" x 29"
-
Bottoms - 22 3/4" x however wide the face
frame is minus 3/4"
-
Shelves - 14 3/4" x however long they need to
be - you don't want the shelf the full depth
-
Backs - however long the bottom is x 29 3/4" x
1/2" thick (this is the only 1/2" material used on the base cabinet)
-
Toe-kick - 4 3/4" wide strips and 2" wide
strips (I get these out of the scrap so cut them last)
Wall cabinets
-
Sides and partitions - 10 3/4" x 26 7/8"
-
Shelves - 10 3/4" x however long they need to
be - on wall cabinets you want them the full depth
-
Bottoms and tops - however wide the face frame
is minus 3/4" x 10 3/4"
-
Backs - however wide the face frame is minus
3/4" x 28 3/8" x 1/2" thick (this is the only 1/2" material used on the wall
cabinet)
Face Frames
-
All rails are 2" wide (using
pocket hole joinery is best however butt joints work well)
-
All outside stiles are 1 5/8" wide*
-
All partition stiles are 1 3/4"*
-
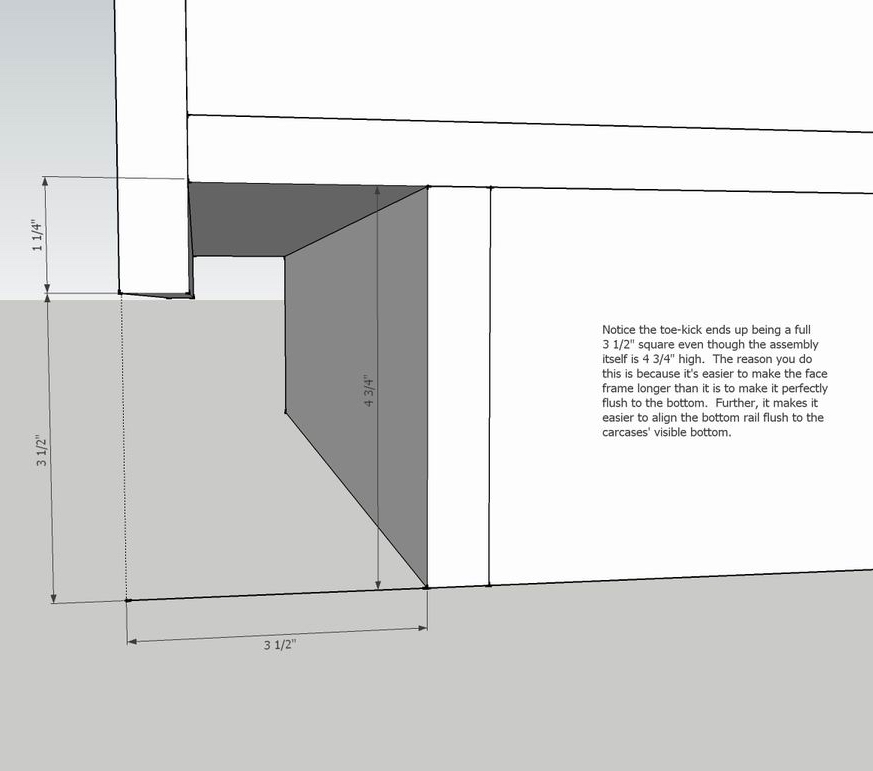
Face frames extend 1 1/4" below the carcase
(see drawings below)
* - These widths allow you to use
1/2" spacers when/if it comes time to install drawers (see the
drawer video links at the bottom of this course).
The intended use of a cabinet determines what sheet material will be the components
making up the cabinet; if it's a cabinet in my shop then the carcase will be plain
particle board. If I'm making a set of kitchen cabinets then they are always Melamine;
it's already finished, easy to clean and looks professional. Plus, it comes in different
solid colors and patterns - nice stuff. One caveat though...be careful handling it
after making a cut - the edges are very sharp and will slice you damn near to the bone.
I try to avoid using plywood unless the grade is AC or better and even with that I
have issues; voids between the layers, football shaped fillers that are all too
visible when a finish is applied, the thicknesses being odd-sized and the cost. Basically,
unless I'm trying to match cabinets already in place or the client specifically
requests it, I don't use plywood.
The first thing I do is cut all the components
making up the cabinets and mill the face frame material. I stack them
against a wall in sections; tops/bottoms, sides/partitions, backs, etc. I
do this because I place trust in the cut list generated from a 3D modeling
program called SketchUp and you'd do well to
download this wonderful program. With it in hand I can easily cut all the parts
for an entire set of average kitchen cabinets in two hours and never once question
the accuracy of the dimensions.
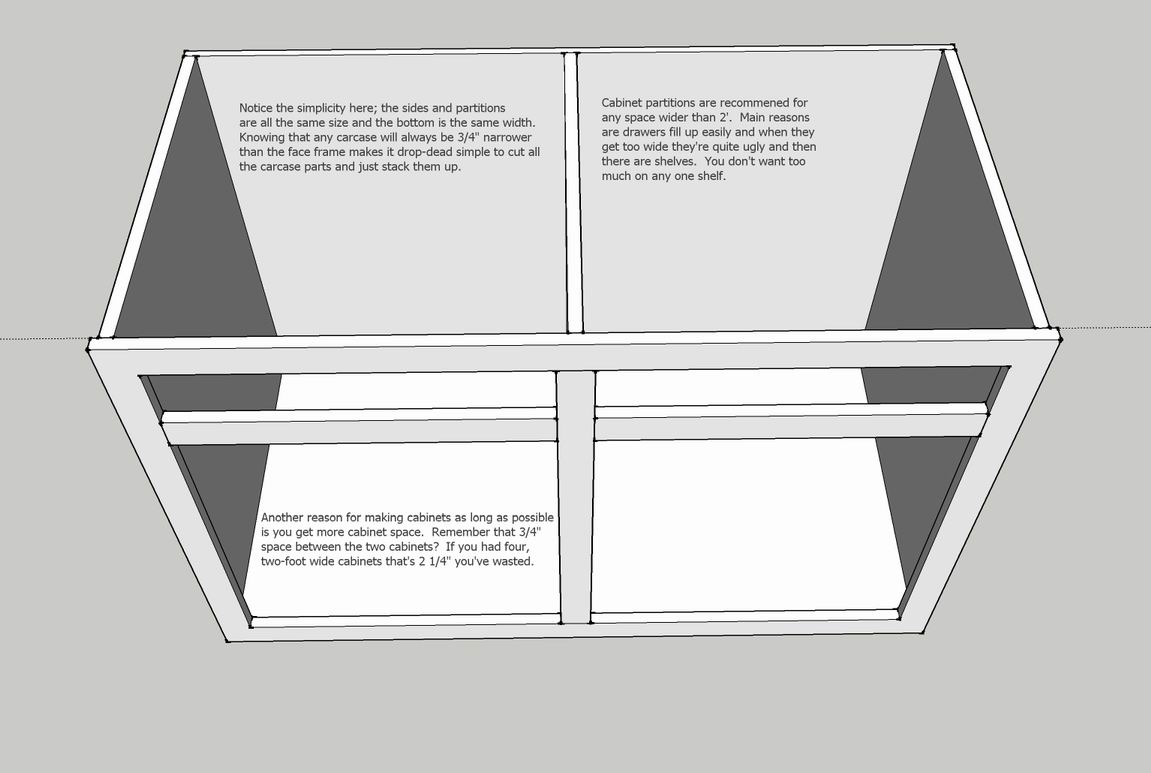
Take a look at this model of expanded parts making up a
standard base cabinet. Notice there are only four major parts; the
back, the sides and/or partitions, the bottom and, finally, the toe-kick
assembly.

And this is what is looks like assembled.
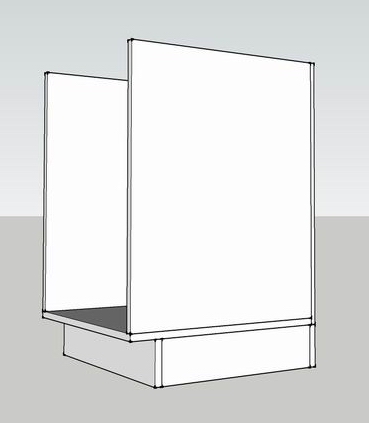
Assembling the basic carcase couldn't be simpler.
Stand the bottom up on your floor and lift one of the sides or partitions into
place, staple it every 3" using 1 1/2" staples then repeat for the remaining
side and/or partitions. Now you have at least a "U" shaped figure.
Place the back on and begin stapling (without changing sizes - this is all about
speed here) it onto the carcase frame making sure one side and the bottom align
then staple the other side. If your cuts are square then your carcase is
square. In other words, don't worry about it, move on.
After all the base cabinet carcases are assembled
and laying scattered on your shop floor, it's time to put on the
toe-kick-assembly. Run around and stand all the carcases bottom up and use
the scrap material left over to cut the pieces. Staple them as shown
below.

The toe-kick couldn't be simpler. See
how the assembly raises the carcase off the floor? See how the face frame
extends below the carcase bottom? An 1 1/4" + 3/4" is 2"! Presto!
With the rails milled to 2" all you have to do is flush the face
frame with the upper surface of the bottom shelf while making sure to overhang
the stiles by
3/8" on each side. |